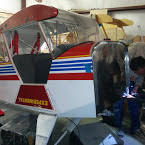
Dakota Hawk Almost Ready to Fly
The Dakota Hawk N280DH- is almost ready to fly.
The 0-200 overhauled engine is now running
THANKS – CHAMPION AEROSPACE and SLICK MAGS, MARVEL SCHEBLER, B&C, SKYTEC, AIRCRAFT SPECIALTY SERVICES, WESTSTAR EAA CHAPTER 800, THE KEBLER FAMILY, COLORADO AIRPARTS, AND ALL THE OTHERS that helped bring this engine back to life. Now we can taxi the airplane back and forth to the build hanger (weather permitting). We have started working extra week days and with the schools in our area finished the kids are able to work extra days. Anthony is painting the last of the hawk parts and bottom cowl. John and Josiah have finished the engine baffle. The PAC prop is on and the weight and balance has been performed.
MATCO Inc. donated a modification of our existing 6 inch solid tail wheel tire and made it a wide 8 inch tire with a tube. This mod gained about 4 pounds on the tail and is awesome. THANKS MATCO! This airplane features all MATCO LANDING gear and brake parts including their parking brake and copilots brakes. Even with this heaver tire and the ELT in the tail we are still adding about 7 pounds of weight to the tail. With all the repairs and the added systems the airplane’s empty weight came out at about the same empty weight as the original 756 pounds. We are adding 7 pounds of lead in the tail so a 125 pound pilot can fly it without adding baggage weight to keep the airplane in CG. A 200 pound pilot puts the airplane at forward CG as it sets but for our lightweight kids to fly it solo we need the extra weight. The airplane will fly to Oshkosh.
Jun 27, 2015 Build Report
Another build day bites the dust! The airplane is starting to look like an airplane. This week there was a definite lack of kids- Josiah and Anthony were it. Its vacation time and warm so most of the young builders families have other endeavors like barbecues, weddings, fishing or just enjoying being warm and dry and just goofing off.
John W and Josiah installed the engine mount permanently. They spent a lot of time trying to figure out torque values for the bolts. 4313 does not address torque values for wood structures. After much searching on the internet by myself and Jerry F no real way was found to access what to torque the mount bolts as to not crush the wood. Pat W and Ken P worked on installing the tail feathers. Again how tight is tight enough on wood? Standard torque values will crush the wood. Interestingly after much searching we found Composite torque values in the Cirrus maintenance Manuel and they are about half the normal published torque values. even the Hawk build Manuel’s we have do not address this that we could find. I started calling around and as usual Don Coleman has the answer and also confirmed what we found- nothing published even he could find. INTERESTING!. Anyway here is the answer per the pro Don C.- with AN hardware Snug the nut up. then on soft material (which is what we have on the tail) add 1/2 turn. On hard wood (our mount) add one full turn. The old way of tightening bolts to max and leaving off the 1/2 turn before you strip it is definitely out on wood – it just keeps crushing! Armed with this info the tail ins on. Josiah, Anthony, Pat and Ken P got er done. The mount is also installed with no innocent wood damaged in the process.
(As a side note when Tres brought his Pietenpol out to our dry climate from California all the bolts and nuts became slightly loose, When he went home they tightened right back up. according to Tres Composites also do this, that is one of the reasons for white or light colors on composites. Even on metal airplanes the cables tensions vary with temperature but not so much with moisture).
While the airplane was being properly( I hope) put together Bill Derose, John C, Anthony and I worked on the engine. Everything went smoothly until the last clamps on the push rod tubes were being installed by yours truly. A new – and I quote – new clamp decided to fail (with a loud snap) when compressed ( with the proper tool) to install it. and as usual it was on the last cylinder installed and 2nd from last clamp to install. (Murphy). So we had to loosen the cylinder to install a new clamp, When Brian brings one back from Colorado airparts.
I will be flying balloons in Provo this weekend for the Freedom Festival, so i will not be in the hanger. I have check in Wednesday 2-6 in Provo, so will not get anything done with regard to the HAWK or the Mooney. (I would rather stay here but have flown Provo for the past 31 years). I will be back Sunday because there are no flights on the sabbath due to it being Utah.
There is plenty of work to be done even without me. The baffling can be trial fit on the engine. The control installation can proceed. Hopefully Rodger will have his work of art finished (the beautiful carbon fiber instrument panel), and it can be put together. The wiring can be installed etc.
Anyway the build continues- Sorry for no pictures as my finger could not remember to find the shutter button.
Jun 14, 2015 Correspondence
On Sun, Jun 14, 2015 at 1:34 PM, Roy Evarts wrote:
Hey Eddie,Thats really great news. I am so impressed with whats going on. Any idea about the weight issue? Not that the 0200 won’t solve a lot of that for you.All the best,Roy
The original airplane weighed 740 pounds. with all the changes who knows but I have cut weight everywhere I could. I am hoping we gain less than 50 pounds. We gained weight with the gear mods. We lost weight when we moved the battery forward. I do not know what it had for accessories before, but I am making sure to use everything light weight. The slick mags alone weigh more than 3 pounds less than Bendix mags. We should be able to weigh it in the next few weeks and then we will know if it is a boat anchor. It will still be a lot less than a 150 at about 1000 lbs and has the same power.
Jun 13, 2015 EAA chapter 800 – HAWK Society young eagles build
- Exciting Dakota Hawk news of new equipment, advancing building project (OSHKOSH 2015???)
- Planning for GJRA Walker Field Airshow
- RedTail P-51 Group showing at CAP (Walker Field, afternoon after our EAA800 meeting)!!!
- Hawk Society may demonstrate the Dakota Hawk build at the above RedTail P-51 gathering at CAP.
- Rumor: Ladd Klinglesmith to show Short Field Takeoff and Landing Performance at EAA AIRVENTURE 2015???
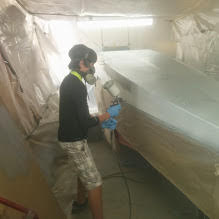
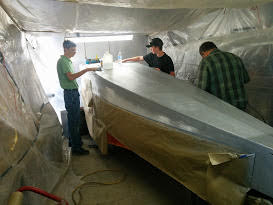
The Dakota Hawk is progressing rapidly. The airplane belly is finished and painted and is on its gear (hopefully permanently). Thanks to Pat and Anthony, it has working brakes (Dual Co-pilot and Pilot) and even a working park brake. Elias, Josiah, Jake, John and Pat installed the new stainless firewall permanently. And the cowl attach brackets Brian made are riveted to the new firewall. Jerry installed the fuel strainer and the cabin heat box. Haley and Anthony worked on the minor patching on the fuselage from past storage and shipping abrasions. The patches will be very hard to find. The tail is almost back on permanently. It will require some tweaking because we apparently do not have the original brackets to attach it at the rear, and the ones off SN 27 do not line up. We need the engine to fit the cowl and cooling baffling.
With the engine next, Bill D, John C, and Jerry managed to come up with enough Hylomar case sealant and Silk thread to Slam the case halves together. I went to Colorado Airparts in Delta and picked up all the hardware needed to put the halves together so we could retire the special aviation section of Ace Hardware nuts and bolts (They can now go back to use on tractors etc.) The correct nuts and intake hoses cost $147.00 (Now I know why the cheap hardware). I forgot the cylinder base seals and one push-rod tube clamp (No Ace hardware hose clamps will be used on this engine) so it will be back to Delta for those. The good news is that the crankshaft end play and cam gear backlash is at new limits. And guess what after the engine case halves were torqued the crank shaft will turn by hand- (This is a good thing because you cannot tow the airplane in gear to break the engine loose.) Also the timing marks line up on the cam gear to the crank gear- this is another good thing and stops all the backfire noise.(Hopefully).
Here is the best part of the week-CHAMPION AEROSPACE donated a complete ignition kit K4520-37BY for the build- This is a pair of new Slick mags, harness and all the spark plugs. I am going to have the kids write thank you letters to Joe Logie and the president of Champion, plus all the other donors. This is by far the largest donation so far short of the airplane, radio and other items donated by Roy Everts. The prop was donated by WestStar and has been ordered.(We are close to flying.) We still need a 150 Carb but can run one the MA3’s we have with a primer installed. Jerry purchase a primer. I ordered new flex-able Stratoflex fuel hose and now have to build them. the hose from the tank to the Fuel strainer is solid aluminum and we are thinking if using a flexible line to do way with the possibility of flare breakage because it is behind the rudder pedals- Which are movable thanks to Pat and Josiah for short kids. We still need an alternator. Anyone have one laying around for an O-200? Preferably a plane power or B&C. We have a vac pump drive B&C 8 amp for sale to help pay for it.
Another really neat donation is from Sky-Tech . Jay Shavel donated a burned up Sky-Tech Lycoming starter to the Chapter. It has been laying around the hanger so I sent it to Sky-Tech for rebuild as it will fit my Mooney and was more junk we were falling over. I explained our build to them and that we had purchased a Sky-tech for the Hawk. They did not charge for the repair. In fact they sent a new Lycoming starter with a 2 year warranty plus decals to apply to the HAWK since we had already purchased one. (this one also cost about $200.00) They want word of mouth advertising. Everyone has been super. Now I have to settle with the Chapter and have the chapter send everyone a donation letter for tax purposes.
We will have a very nice looking well built Dakota HAWK flying shortly with a newly rebuilt 0-200 engine with all new accessories and prop. Try to do that for well under $5,000.00 – I dare you!
And the build continues!
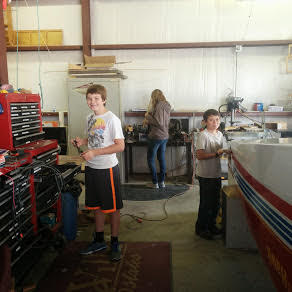
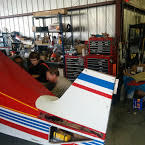
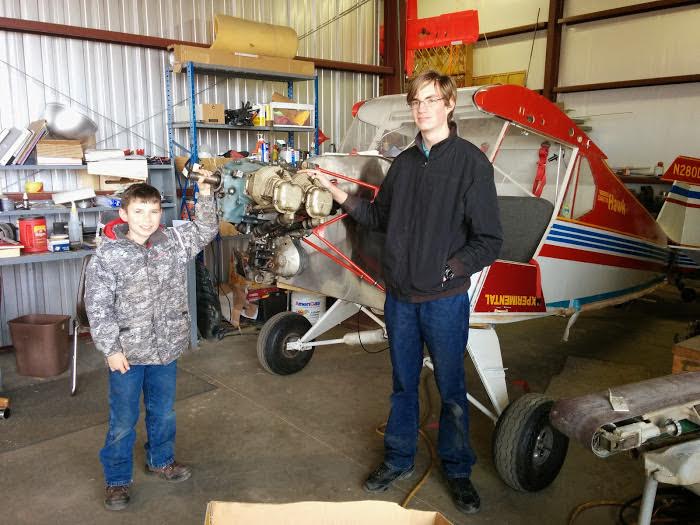
The following picture’s are of some of the build kids: